Trunk Restoration Tips
Restoring a trunk is like painting a picture. You may take any approach
you want.
You can paint it, or strip it. If you are missing parts, and are
unable to match them, you can take parts from the back, put them on the
front, and put your replacement parts on the back.
CAUTION; Don't get carried away in your enthusiasm to do a thorough
job. It is best to clean up the parts in place, on the trunk, rather than
removing them all. If you have removed them, and want to replace them with
new, reproductions, in most cases will not be an exact match. Your only
alternative is to have them brass plated.
Or; "do-it-yourselfers", use steel wool, or wire brush attachment
on a pistol drill, and take them down to clean steel. Spray-lacquer them
to keep them from rusting. You will need approximately 250 of the reproduction
trunk nails (3/4" - 1" sizes) to re-install the pieces on the trunk. Reproduction
nails are a brass-wash finish. If you wish to buff the parts to steel,
rub the nail head over a sheet of "000"or"0000" sandpaper.
Here are some before shots on a trunk we worked on...
Tools Needed:
1. Electric sander; the small hand-held type, also called
an "orbital" or "palm" sander.
(Dont' use the large belt type, as it tears up surfaces too quickly
and coarsely, and is more
awkward to use)
2. Commercial grade sandpaper; "0" to"0000", depending on
how rough the piece is, work up to "0000". (the red cloth type is the most
desirable, but is very hard to find)
3. Drill (with wire brush attachment); A standard 3/8" pistol
drill, with attachment for cleaning steel parts.
4. Dremel; Good for fine details that a drill with wire brush
can't reach.
5. Steel Wool; For cleaning and smoothing of all parts and
finishes, before staining and/or lacquering.
6. Vacuum with hose attachment; Keep everything clean as
you go, including sandpaper (less waste)
7. Screwdriver, claw-hammer, diagonal cutters; To aid in
the removal of old parts.
8. Anvil (flat iron or auto-body working tool); good for
securing trunk nails which curl into the wood.
9. Wallpapering items; Scissors, smoother, brush, tray, dry
towels, razor blades (single-edged)
10. Yardstick; And tape measure.
11. Safety glasses or goggles;Help keep dust out of your
eyes as well as providing protection when nailing or removing old nails,
or sanding.
Materials Needed:
1. Wallpaper; We suggest you do not use vinyl. It usually
doesn't adhere as well in the long run.
Regular (used to be) cheap prepasted wallpaper is best, if you can
find it, and/or afford it. You may have to hunt to find it, anymore.
Using a small-all-over print, less matching will be required. With
striped paper, matching up the stripes makes the job more time-consuming,
but you can get creative.
2. Small old-fashioned pictures; For inside lid decoration.
Here you can use that striped wallpaper to make a border to frame pictures
and do your detailing.
3. Trunk nails and rivets; Made of malleable (soft) iron,
but when applied properly, will hold very securely. The trick is to curl
them into the wood, as was done originally (1880's).
This is accomplished by holding your flat iron or hand-held anvil
or anything heavy against the head of the nail while tapping the end of
the nail inside the trunk, ensuring that a curl is started. Once
started, tap the curling nail firmly back into the wood. The better the
curl, the better the holding power. Note: regular nails will not curl,
but will merely bend over and will not hold anything. RIVETS are used best
where lesser weight or pull will be exerted. (Locks) Rivets may also be
used where wood has been damaged and the hole is oversized, preventing
the nail from being effectively curled.
4. Missing pieces; Handles, loops, straps, hinges, locks,
corners, decorative pieces, latches, bottom rollers, lid stays, etc. (see
Trunk Parts page of Muffs catalog)
5. Spray lacquer; For overall finishing and sealing. CAUTION:
DO NOT USE VERATHANE, it chips and cracks. We prefer "DEFT" semi-gloss
clear wood finish (found at paint and decorating centers)
6. Spray stain; For coloring new leather handles and straps,
for that "aged" look.
7. Brush-on stain; For all wooden parts.
8. Spray paint; Flat black, for tin pieces you will want
to resurface.
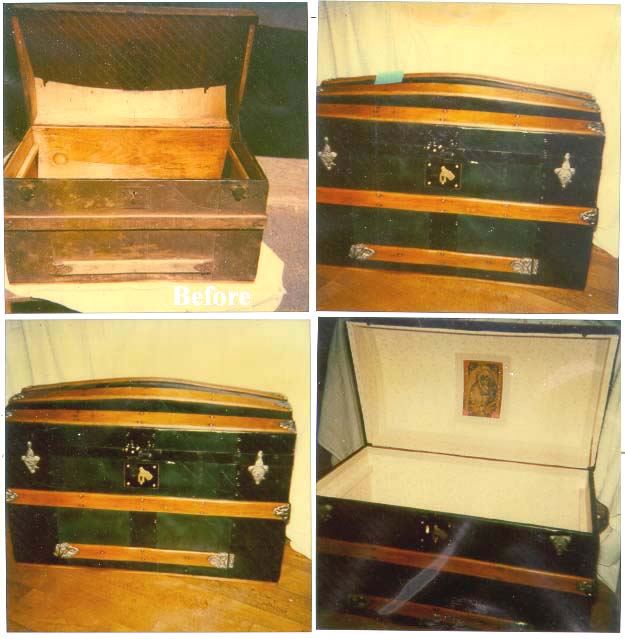
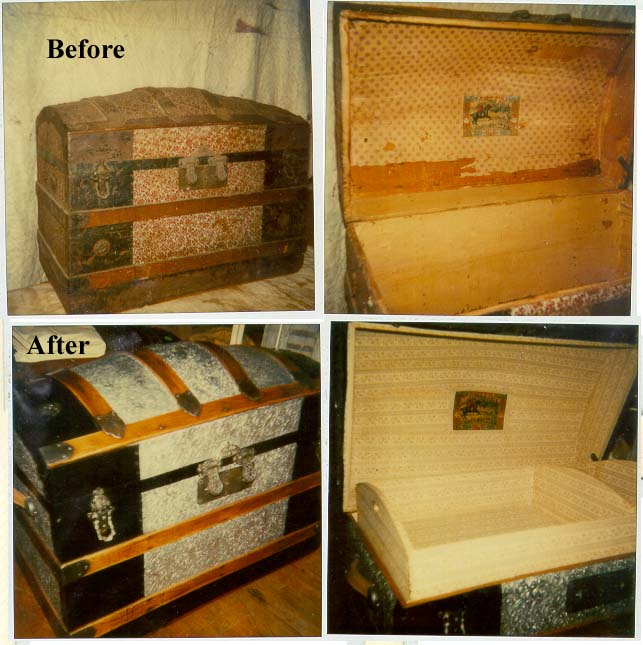
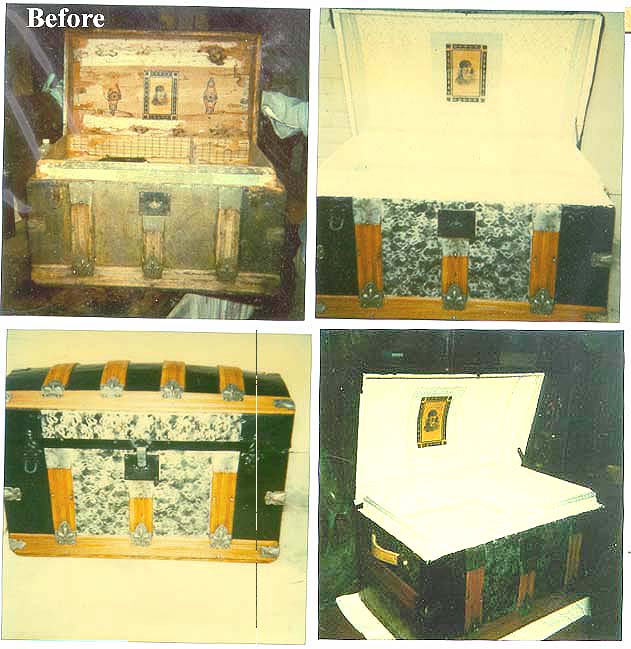
Analyzing The Job
(Note:"Before and after" pictures should be considered here.) See
our Example 1; Example2;
Example3; Example 4
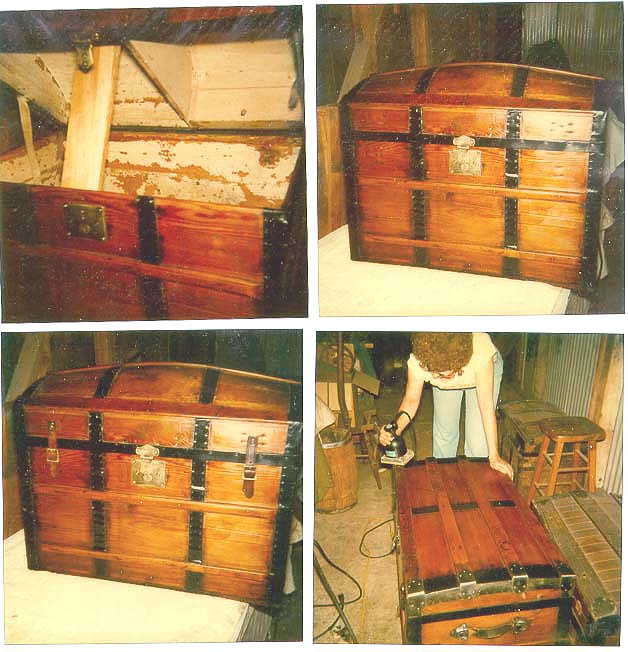
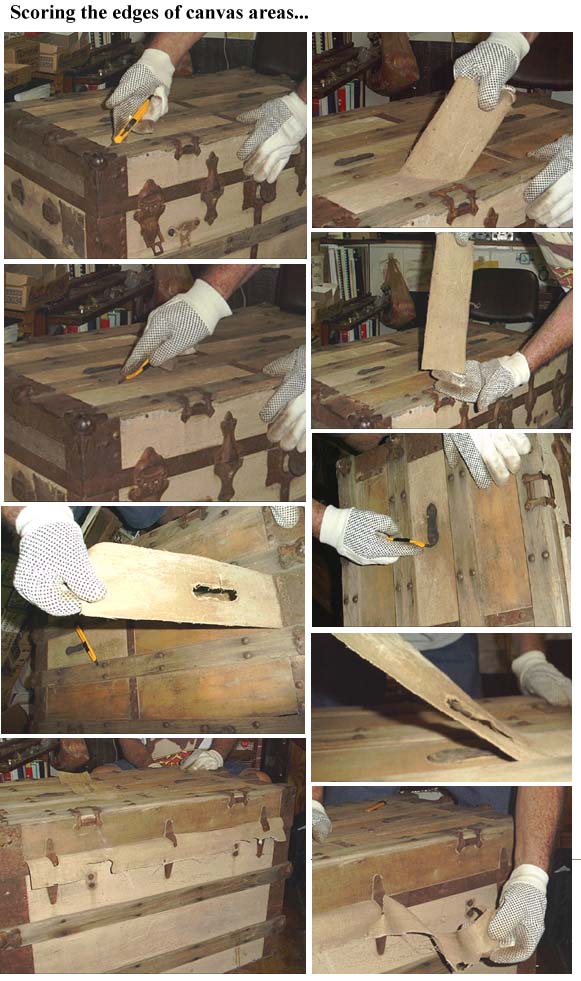
1. Old torn canvas may need to be removed. Use a razor or cutting
blade. If canvas is tight, consider repainting. Sometimes canvas is nearly
impossible to remove, due to glue or adhesives used in applying originally.
Here
is what it looks like...
2. You will need to remove carefully the handle end-covers or "loops"
on any missing, broken, or weak handles that need replacing. Here
is what that looks like...
3. Keep all pieces that you remove in a box or tin. Often, these
things get "lost in the shuffle".
4. Do all exterior nailing and tacking before papering the interior.
Papering then will cover nails on the inside.(see "Materials"#3 for instuctions
on tacking and nailing.)
More problems
Brief Run Down
1. Sand and clean all outer surfaces;
A. For wood; sand in the direction of the grain.
B. Metal; Steel wool will help remove rust from metal.
2. Replace all parts needed; (See parts page Muffs catalog
and order form)
3. Stain all wood, paint all metal panels, if desired.
4. Allow to dry for a few days.
5. Seal all outside surfaces; using "Deft" or other semi-gloss
lacquer spray.( Don't use a high-gloss finish)
6. Measure inside for wallpaper. "Size" the trunk by "painting"
the inside of the trunk with a coat of wallpaper paste, using an appropriate
brush, with large bristles, possibly. Let it dry. Precut strips of wallpaper
for the corners or edges that run the length and width/depth of the inside.
Put them in water briefly to loosen the paste or wet the adhesive. Apply
them, and while they are drying you can cut the rest of the paper for the
large remaing areas of the sides and bottom. Then apply these sides and
bottom areas. Those strips, having been put in first gives you a more easily
achieved "seamless" look to these places where the sides and the bottom
meet. (There will be a slight overlap to them.)
7. Plan on design, or picture inside lid, and border, and apply.
8. Leave top open to dry.
c 1998 Muff's (revised 2006)